


Essential Lintel Repair DIY Methods for Your Home
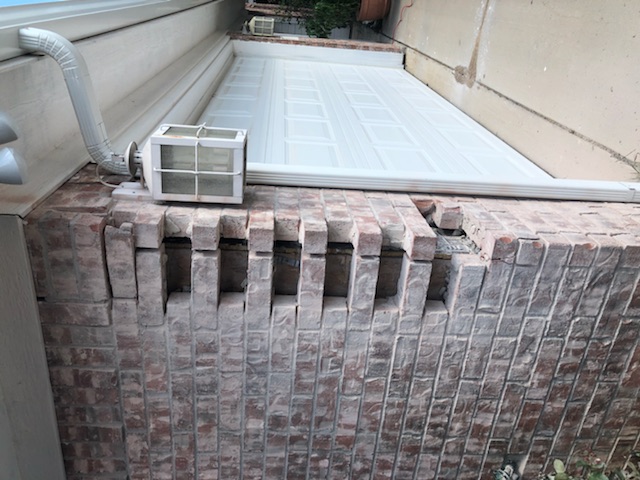
When it comes to maintaining the structural integrity of your property, lintels play a crucial role. These horizontal supports above doors and windows bear the weight of the masonry above them. Over time, lintels can suffer from wear, corrosion, or damage, especially in older buildings. But don’t worry - with the right approach, you can tackle lintel repairs yourself. I’m here to guide you through practical, effective lintel repair DIY methods that will help you restore strength and safety to your home.
Understanding Lintel Repair DIY Methods
Before diving into repairs, it’s important to understand what lintels are and why they fail. Lintels are typically made from steel, concrete, or timber. Steel lintels are common in modern construction, but they can rust if exposed to moisture. Concrete lintels may crack or spall, while timber lintels can rot or warp.
Here’s a quick overview of common lintel issues and how DIY methods address them:
Rust on steel lintels: Remove rust, treat with anti-corrosion paint, and apply protective coatings.
Cracked concrete lintels: Clean cracks, fill with repair mortar, and reinforce if necessary.
Rotting timber lintels: Remove damaged wood, treat remaining timber, and replace sections if needed.
By understanding these basics, you’ll be better prepared to choose the right repair technique for your specific lintel problem.

Step-by-Step Guide to Lintel Repair DIY Methods
Let’s get hands-on. Here’s a straightforward process to repair lintels yourself, focusing on steel and concrete types, which are most common.
1. Assess the Damage
Start by inspecting the lintel carefully. Look for:
Rust or corrosion on steel lintels
Cracks or spalling on concrete lintels
Signs of sagging or deformation
Use a flashlight and a small hammer to gently tap the lintel and surrounding masonry. Loose or hollow sounds indicate damage.
2. Prepare the Area
Safety first! Wear gloves, goggles, and a dust mask. Remove any loose debris, rust flakes, or crumbling mortar around the lintel. Use a wire brush or grinder to clean steel lintels thoroughly.
3. Treat and Repair
For steel lintels: After cleaning, apply a rust converter to neutralize corrosion. Once dry, paint with a rust-resistant primer and finish with a protective topcoat.
For concrete lintels: Fill cracks with a high-quality repair mortar. For larger damage, consider applying a concrete patch or using a bonding agent before patching.
For timber lintels: Remove rotten sections and treat the remaining wood with a preservative. Replace any severely damaged parts with treated timber.
4. Repointing and Finishing
Once the lintel is repaired, repoint the surrounding brickwork with fresh mortar. This seals the area and prevents water ingress, which can cause future damage.
5. Monitor and Maintain
After repair, keep an eye on the lintel’s condition. Regular maintenance can extend its lifespan and prevent costly future repairs.
If you want to explore more detailed methods, check out this resource on diy lintel repair techniques.

Do You Put Mortar on a Steel Lintel?
This is a common question, and the answer depends on the lintel’s design and condition. Steel lintels are often embedded in mortar or concrete to distribute the load evenly. However, applying mortar directly onto a corroded steel lintel without proper preparation can trap moisture and accelerate rusting.
Here’s what you should do:
Clean the steel lintel thoroughly to remove rust and old mortar.
Apply a rust-inhibiting primer to protect the steel.
Use a suitable mortar mix that bonds well with steel and masonry.
Ensure proper drainage so water does not accumulate around the lintel.
If the steel lintel is in good condition, repointing with mortar is standard practice. But if rust is present, address that first to avoid further damage.
Tips and Cautions for DIY Lintel Repairs
Taking on lintel repairs yourself can save money and give you a sense of accomplishment. But keep these tips in mind:
Safety is paramount: Always wear protective gear and work carefully, especially when dealing with structural elements.
Don’t ignore signs of serious damage: If the lintel is severely cracked, sagging, or the masonry is unstable, consult a professional.
Use quality materials: Cheap mortar or paint can fail quickly, leading to repeated repairs.
Work in dry weather: Moisture can affect mortar curing and paint adhesion.
Take your time: Rushing can lead to mistakes that compromise the repair.
By following these guidelines, you’ll ensure your lintel repair is both effective and long-lasting.
Keeping Your Lintels Strong for Years to Come
Lintels are vital to your home’s structure, and maintaining them is key to preventing costly damage. With these DIY lintel repair methods, you can confidently tackle minor repairs and keep your property safe and sound.
Remember, regular inspections and timely repairs are your best defense. Whether you’re dealing with rust, cracks, or rot, the right approach will restore your lintels’ strength and durability.
If you want to dive deeper into practical solutions, don’t hesitate to explore more about diy lintel repair techniques. Your home deserves the best care, and with a little effort, you can provide it yourself.
Comments